|
Setting up your email
account
|
 |
|
|
|
Setting up your Email account through Outlook Express v
5.x
Follow the steps on the right of the screen to easily set up your account and then look at the text below for setting up an alternate reply address. Setting up an alternate reply address : These instructions are for Outlook Version 5.x.
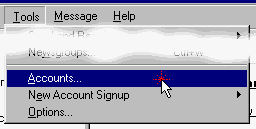
Open Outlook Express and go to the Tools menu and select
Accounts...
Click OK. After following these instructions you should be set up to collect your E-mail from your new account. Congratulations.
|
||
|
1) Accounts... |
||
| Go to Tools menu and select Accounts... (near the bottom) | ||
|
2) Mail... |
||
 |
||
|
Click the Add button and select Mail from the popup menu. |
||
|
3) Display Name |
||
|
|
||
|
Type in the name you want to appear on your messages. |
||
|
4) Email Address |
||
 |
||
|
Select 'I already have an e-mail address' and enter your
assigned e-mail address. |
||
|
5) Incoming mail server type |
||
|
|
||
| Select 'Incoming mail' as POP3 | ||
|
6) Incoming mail server |
||
|
|
||
|
For 'Incoming mail server' enter "mail.cravenplan.co.uk" |
||
|
7) Outgoing mail server |
||
|
|
||
|
Your 'Outgoing mail server' is what you ISP's mail server
has assigned you with. |
||
|
8) Account Name & Password |
||
 |
||
|
Enter your assigned account name and password used when
applying for this E-mail account. |
||
|
9) Finished |
||
|
|
||
|
That's it you are done. |
||
|
10) Collecting mail |

