|
(Bits & Bytes Users Group)
Computer Club of The Tropics |
Use the following steps to install a second hard drive. Before beginning, you will need the following items:
- Get a Phillips screwdriver and a medium flat-blade screwdriver.
- HP strongly recommends the use of an anti-static wrist strap and a conductive foam pad when working on the computer.
- Find a clear, flat, stable work surface over a non-carpeted floor.
Step 1: Open the case
WARNING: The edges of metal panels can cut skin. Be careful not to slide skin along any edge of the computer's interior metal.
- Unplug all cables except for the power. Write down where each cable goes.
- Unplug the power cable. Always disconnect the computer's power before opening its case.
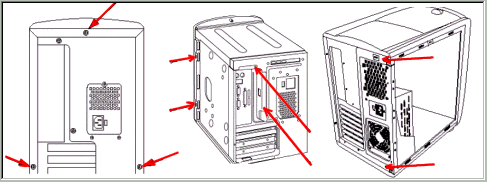
- Remove or loosen the panel retainment screws. Refer to Figure 1 below for examples of some retainment screw locations.
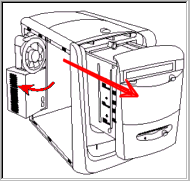
- Remove the panels to expose the inside of the computer by sliding them off. Some HP Pavilions will have swing-out or slide-out bays to allow easier access to the components inside as shown in Figure 2. Make sure not to dislocate any of the cables inside when moving these bays.
Figure 1: Panel retainment screw locations

Figure 2: Slide out bays and panels

Step 2: Remove and install the new hard drive
- Locate the empty bay inside the computer. Usually there is an empty bay directly above the hard drive that is already installed.
- Slide the hard drive into the bay leaving the hard drive's IDE connector pointing to the inside of the case.
- Line up the screw-holes that are in the side of the hard drive so that they can be seen though the slots of the hard drive bay. Secure the hard drive with the screws provided by the hard drive.
- Follow the instructions that came with the new hard drive to set it as the slave drive. Setting a jumper on the hard drive usually does this.
- Find the IDE cable that is already connected to the existing hard drive. There should be another open IDE connector somewhere along the length of the cable. If there is not, then a new IDE cable with three IDE connectors will need to be purchased from a local computer store before continuing.
- Attach the open IDE connector on the cable to the IDE connector on the new hard drive. The connector is usually keyed so that it cannot be installed wrong. If the cable has a red stripe that runs down one side, then that side of the cable connector needs to connect to the same side as the number 1 pin on the hard drive.
- Find an open power connector and connect it into the back of the hard drive. The power connectors are the connectors with the thicker yellow, black, and red wires coming into them. These connectors are keyed so that they cannot be mis-installed.
- Make sure that all of the connectors are fully seated. An IDE cable connector becoming loose causes many different hard drive errors.
Step 3: Replace the cover
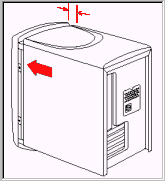
- Match the 'attachment fingers' inside the panel or cover to the slots in the chassis. There is usually a gap before sliding a panel into place (Figure 3).
- Slide the panel or cover into place and attach it using the same screws that were used when it was removed.
- Reconnect the keyboard, mouse and power cables into the back of the HP Pavilion. Plug the power cord in last.
Figure 3: Replacing the cover

Step 4: Configure the new hard drive
- Turn on the PC. When the blue HP logo screen appears, press F1 to enter the BIOS.
- The existing drive and the new drive should show up under primary and secondary IDE. If not, open the case back up and verify that the IDE cables are firmly and correctly installed. Next, verify that the new hard drive switch is set according to the manufacturer's recommendation.
- Place the first recovery disk into the first optical drive and shut the door.
- With the BIOS screen still on, turn off the computer by holding down the POWER button. Wait 60 seconds before turning the computer back on.
- At the Advanced Options menu, select DOS Screen.
- At the prompt in the DOS screen, type FDISK and then press ENTER.
- Type Y and press ENTER to enable large hard drive support.
- At the FDISK options screen, type 5 to select Change current fixed hard drive, then press ENTER.
- Type 2 to select hard drive number 2.
- Type 1 to Create DOS partition or Logical drive.
- Type 1 to Create Primary DOS partition.
- A message will be displayed asking if you want to use all available space. Type Y and press ENTER to select Yes.
- A message will be displayed that the Primary Partition has been created. Press ESC to exit to the FDISK menu.
- Restart Windows and format the hard drive.
